Utilizing state machines in front-end development
The state machine is a very old concept. In fact, it even precedes modern computers. Despite its respectable age, the state machine is a super useful computational model to have in your toolbox of modern web development. Recently, there has been a lot of buzz around state machines and especially a popular state machine library called XState.
In this blog post, I’ll give you a brief 101 lecture on state machines and their extension, statecharts. After that, we’ll take a look at some real-world examples of how to use state machines in a React web app context.
What are finite state machines?Permalink to What are finite state machines?
Let us start with some theory. If you have studied computer science, you might remember this stuff from class. And even if not, you still might have heard the term Finite State Machine or FSM for short.
So, what are the FSMs? According to Wikipedia, an FSM is…
… an abstract machine that can be in exactly one of a finite number of states at any given time. The FSM can change from one state to another in response to some inputs; the change from one state to another is called a transition. An FSM is defined by a list of its states, its initial state, and the inputs that trigger each transition.
A lot of jargon, I know. To put it simply, state machines are abstractions that are used to describe the behavior of some system, which might be an algorithm in your web app, a physical device in real life, or the whole solar system.
One of the nicest things about state machines is that they are convenient to present visually. For example, let’s take a look at a state machine representing a simplified version of a traffic light.
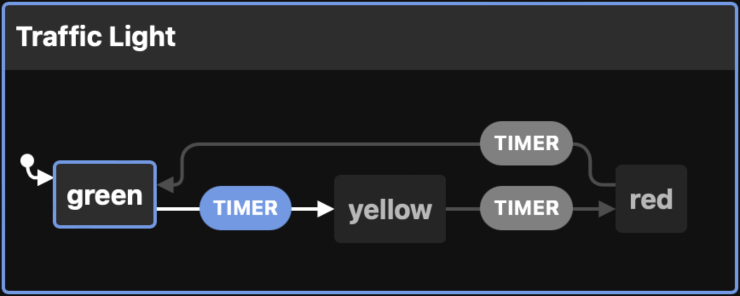
In most countries, there’s a combined red-yellow state, but in this simplified version, the machine has three different states: green, yellow, and red. It can be in only one of these states at one time. On the left, the little dot with an arrow pointing to the green state marks the initial state of the machine. Meaning that the green state is activated when the machine is executed.
The arrows between states are the possible transitions. In this very simple machine, every state has only one possible transition. The pill-shaped boxes are the external inputs that trigger the transitions. This machine only has one input called timer, that triggers a transition from one state to another. Notice how the same input triggers a transition to a different state based on the current state: when the machine is in the yellow state, timer transitions the machine to the red state, and from the red state, it goes to the green state when a new timer input occurs.
Sweet. Now here’s a little bit more complicated state machine. This one is for a dimmable light switch:
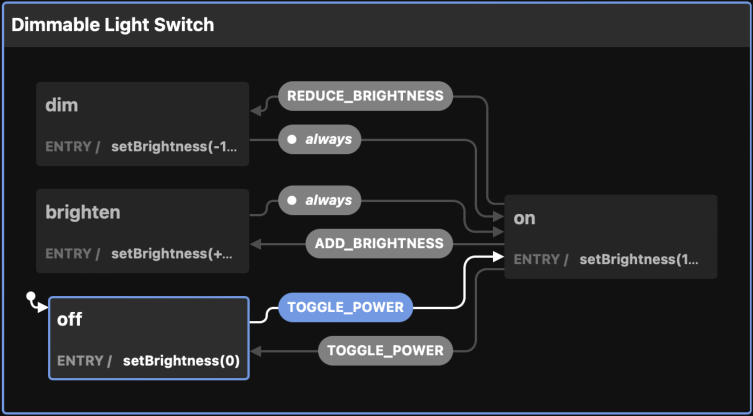
We have a couple of new concepts here. First, when we enter the initial state off, we immediately trigger an action called setBrightness(0). Actions are fire-and-forget side effects that don’t affect the machine itself. This one is an entry action, meaning it will get triggered when the machine enters the state.
We could also have actions for exiting a state or actions to be launched while the machine is transitioning to another state.
When the machine is in the on state and gets triggered by REDUCE_BRIGHTNESS or ADD_BRIGHTNESS inputs, it will transition to the dim or the brighten state, respectively. Those states have entry actions that control the actual light IRL. After that, something called a transient transition occurs, meaning that the machine transitions to another state right away. So back to on state we go.
Statecharts help to model complicated systemsPermalink to Statecharts help to model complicated systems
When your state machine starts to grow, it can become a bit of a mess. Statecharts.dev has a good explanation of a problem dubbed state explosion. Long story short, state machines are great but cannot scale to more complex use cases very well. Statecharts build on top of state machines and add some new concepts like parallel states, hierarchies, and guards, just to name a few.
If we take the traffic light example from before and make it a bit more complicated, it might look something like this:

The initial state of the machine is offline. When the TURN_ON input is sent to the machine, it transitions to the red state, which is a state machine of its own! It has its own states, initial state, transitions, and so on. When the parent machine reaches red, the child machine gets executed and starts from its initial state. The parent machine could wait for the child machine to reach its final state, but in this case, the parent keeps going at the same time while the timers make sure the correct lights are on at any given time.
I’m coding forms and list views, not traffic lights. Why should I care?Permalink to I’m coding forms and list views, not traffic lights. Why should I care?
What a great question! Next, we’ll learn how you could actually use state machines and statecharts in your front-end code.
Let’s start with a simple React component called SearchForm. We’ll store the keyword and the results in a basic useState state and render a form and the search results if any. Submitting the form fetches the results from our API.
const SearchForm = () => {
  const [keyword, setKeyword] = useState("");
  const [results, setResults] = useState([]);

  const search = (event) => {
    event.preventDefault();

    fetchResults(keyword).then((results) => setResults(results));
  };

  return (
    <div>
      <form onSubmit={search}>
        <input onChange={(event) => setKeyword(event.target.value)} />
        <button type="submit">Search</button>
      </form>

      {results.length > 0 && results.map((result) => <p>{result}</p>)}
      {results.length === 0 && <p>Sorry! No results.</p>}
    </div>
  );
};
Great. The happy path is mostly covered, but what happens when the API fails for some reason? Let’s add some error handling. We’ll add a new useState for hasError and set the error if the fetch fails.
const SearchForm = () => {
  const [keyword, setKeyword] = useState("");
  const [results, setResults] = useState([]);
  const [hasError, setHasError] = useState(false);

  const search = (event) => {
    event.preventDefault();

    setHasError(false);

    fetchResults(keyword)
      .then((results) => setResults(results))
      .catch(() => setHasError(true));
  };

  return (
    <div>
      <form onSubmit={search}>
        <input onChange={(event) => setKeyword(event.target.value)} />
        <button type="submit">Search</button>
      </form>

      {hasError && <p>Oh no!</p>}
      {results.length > 0 && results.map((result) => <p>{result}</p>)}
      {results.length === 0 && <p>Sorry! No results.</p>}
    </div>
  );
};
How about a loading state? We will probably want to show a spinner or something while the search is executing. Let’s do that by adding yet another useState call, setting the loading state in the search function, disabling the button, and showing a message while the app is loading.
const SearchForm = () => {
  const [keyword, setKeyword] = useState("");
  const [results, setResults] = useState([]);
  const [isLoading, setIsLoading] = useState(false);
  const [hasError, setHasError] = useState(false);

  const search = (event) => {
    event.preventDefault();

    setIsLoading(true);
    setHasError(false);

    fetchResults(keyword)
      .then((results) => setResults(results))
      .catch(() => setHasError(true))
      .finally(() => setIsLoading(false));
  };

  return (
    <div>
      <form onSubmit={search}>
        <input onChange={(event) => setKeyword(event.target.value)} />
        <button type="submit" disabled={isLoading}>
          Search
        </button>
      </form>

      {isLoading && <p>Searching...</p>}
      {hasError && <p>Oh no!</p>}
      {results.length > 0 && results.map((result) => <p>{result}</p>)}
      {results.length === 0 && <p>Sorry! No results.</p>}
    </div>
  );
};
Nice. What does the search form look like before the user has searched anything? It just says “Sorry, no results”, right? We could add a new bit of state, that keeps track if the user has searched or not to address that.
By growing the app we are starting to encounter some corner cases that we need to think about. Could the isLoading and hasError boolean flags be both true at the same time? How about the new hasSearched flag? Which combinations of these three are possible and what should we print out for each combination? Every boolean flag we are adding multiplies the possible combinations, and every combination should be handled one way or another. Every bit of state makes the component more complicated and more difficult to comprehend.
So, how could we fix this? If you are thinking of state machines, you are correct!
State machines to the rescuePermalink to State machines to the rescue
First, let’s define the states the component can be in. We’ll use a plain object for easier autocompletion and typo-proofing. If we were using TypeScript, a union type or an enum would work even better.
const states = {
  INITIAL: "INITIAL",
  LOADING: "LOADING",
  FAILURE: "FAILURE",
  NO_RESULTS: "NO_RESULTS",
  SHOW_RESULTS: "SHOW_RESULTS",
};
Now we can use just one variable for the current state and it will always be set to one of the predefined values. Generating the output is now much easier since we know all the possible states the component can be in. No more dozens of combinations or corner cases.
const SearchForm = () => {
  const [state, setState] = useState(states.INITIAL);
  const [keyword, setKeyword] = useState("");
  const [results, setResults] = useState([]);

  const search = (event) => {
    event.preventDefault();

    setState(states.LOADING);

    fetchResults(keyword)
      .then((results) => {
        setResults(results);
        setState(results.length > 0 ? states.SHOW_RESULTS : states.NO_RESULTS);
      })
      .catch((error) => setState(states.FAILURE));
  };

  return (
    <div>
      <form onSubmit={search}>
        <input onChange={(event) => setKeyword(event.target.value)} />
        <button type="submit" disabled={state === states.LOADING}>
          Search
        </button>
      </form>

      {state === states.INITIAL && <p>Hi! Enter keyword please.</p>}
      {state === states.LOADING && <p>Searching...</p>}
      {state === states.FAILURE && <p>Oh no!</p>}
      {state === states.NO_RESULTS && <p>Sorry! No results.</p>}
      {state === states.SHOW_RESULTS &&
        results.map((result) => <p>{result}</p>)}
    </div>
  );
};
Much better already. But it’s not quite a proper state machine yet. Referring to the definition of an FSM at the start of the blog post, we know that now our component can be only in one state of a finite set. We also transition to different states based on inputs. Our initial state is set. However, we haven’t defined the conditions for each transition yet.
We could fix that by defining a list of possible transitions. While at it, let’s add a utility function for checking if a transition from state A to B is valid.
const states = {
  INITIAL: "INITIAL",
  LOADING: "LOADING",
  FAILURE: "FAILURE",
  NO_RESULTS: "NO_RESULTS",
  SHOW_RESULTS: "SHOW_RESULTS",
};

const transitions = {
  INITIAL: ["LOADING"],
  LOADING: ["FAILURE", "NO_RESULTS", "SHOW_RESULTS"],
  FAILURE: [],
  NO_RESULTS: [],
  SHOW_RESULTS: [],
};

const isValidTransition = (before, after) =>
  transitions[before].includes(after);
In the component, we’ll make sure that all the transitions are validated with the new utility function:
const SearchForm = () => {
  const [state, setState] = useState(states.INITIAL);
  const [keyword, setKeyword] = useState("");
  const [results, setResults] = useState([]);

  const search = (event) => {
    event.preventDefault();

    if (isValidTransition(state, states.LOADING)) {
      setState(states.LOADING);

      fetchResults(keyword)
        .then((results) => {
          setResults(results);

          const nextState =
            results.length > 0 ? states.SHOW_RESULTS : states.NO_RESULTS;

          if (isValidTransition(state, nextState)) {
            setState(nextState);
          }
        })
        .catch((error) => {
          if (isValidTransition(state, states.FAILURE)) {
            setState(states.FAILURE);
          }
        });
    }
  };

  return (
    <div>
      <form onSubmit={search}>
        <input onChange={(event) => setKeyword(event.target.value)} />
        <button type="submit" disabled={state === states.LOADING}>
          Search
        </button>
      </form>

      {state === states.INITIAL && <p>Hi! Enter keyword please.</p>}
      {state === states.LOADING && <p>Searching...</p>}
      {state === states.FAILURE && <p>Oh no!</p>}
      {state === states.NO_RESULTS && <p>Sorry! No results.</p>}
      {state === states.SHOW_RESULTS &&
        results.map((result) => <p>{result}</p>)}
    </div>
  );
};
Not too shabby. Now we pretty much have a finite state machine in place and the code is much easier to comprehend, extend, and refactor. Our component and the whole imaginary app could be improved a lot pretty easily by just following the specification of finite state machines, and doing the work by hand. FSMs have a lot more features we haven’t implemented yet, so it might be worth our while to take a look at some open-source libraries that help us implement state machines.
Enter XStatePermalink to Enter XState
XState is one of the most popular state machine libraries out there for the JavaScript/TypeScript world. It can be used pretty much with any stack you choose and it comes with official utilities for React, Vue, and Svelte. XState allows us to create state machines and statecharts using a configuration object and also execute them.
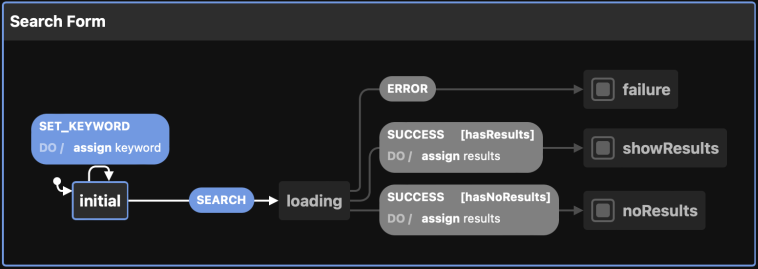
Let’s refactor the search form to use XState instead of our own FSM implementation. The visual representations of the state machine could look something like this:

From the initial state, we transition to loading when search input happens, in our case when the form is submitted. Depending on the result of the fetching (which is not part of the machine), we transition to one of the three final states, indicated by the squares in front of the state name. A final state is a state, that doesn’t have any transitions forward.
The XState configuration could look something like this:
import { createMachine, assign } from "xstate";

const searchFormMachine = createMachine(
  {
    id: "Search Form",
    initial: "initial",
    states: {
      initial: {
        on: {
          SEARCH: "loading",
        },
      },
      loading: {
        on: {
          SUCCESS: [
            {
              cond: "hasResults",
              target: "showResults",
            },
            {
              cond: "hasNoResults",
              target: "noResults",
            },
          ],
          ERROR: "failure",
        },
      },
      failure: {
        type: "final",
      },
      noResults: {
        type: "final",
      },
      showResults: {
        type: "final",
      },
    },
  },
  {
    guards: {
      hasResults: (context, event) => event.results.length > 0,
      hasNoResults: (context, event) => event.results.length === 0,
    },
  }
);
First, we import the createMachine function from XState and pass our configuration object to it. The config has an ID of the machine, the initial state, and definitions of all the states. Each state definition contains all the possible transitions from the current state to some other state. For example, the initial state transitions to the loading state on a SEARCH event (XState calls inputs events).
The transitions can also be guarded by a condition. When the machine is in the loading state and receives a SUCCESS event, a conditional transition occurs. If the search function found some results, the machine is transitioned to the showResults state, otherwise to the noResults state. The guards are defined at the bottom of the config.
In the React component, we’ll need to import the useMachine hook from XState’s React utilities and our machine configuration. We’ll call useMachine with the config and get the current state and a function to send events as a return. We can use these to replace our custom useState managed state and transitions. Instead of checking if a transition is valid and then calling setState, we can use send to send an event to the machine and let it handle the rest. Notice, that we can send data to the machine as part of the event. In the rendering section, we can get the current state from state.value and render the correct stuff accordingly.
import { useMachine } from "@xstate/react";
import { searchFormMachine } from "./searchFormMachine.js";

const SearchForm = () => {
  const [state, send] = useMachine(searchFormMachine);
  const [keyword, setKeyword] = useState("");
  const [results, setResults] = useState([]);

  const search = (event) => {
    event.preventDefault();

    send("SEARCH");

    fetchResults(keyword)
      .then((results) => {
        setResults(results);
        send({ type: "SUCCESS", data: results });
      })
      .catch((error) => send("ERROR"));
  };

  return (
    <div>
      <form onSubmit={search}>
        <input onChange={(event) => setKeyword(event.target.value)} />
        <button type="submit" disabled={state.value === "loading"}>
          Search
        </button>
      </form>

      {state.value === "initial" && <p>Hi! Enter keyword please.</p>}
      {state.value === "loading" && <p>Searching...</p>}
      {state.value === "failure" && <p>Oh no!</p>}
      {state.value === "noResults" && <p>Sorry! No results.</p>}
      {state.value === "showResults" &&
        results.map((result) => <p>{result}</p>)}
    </div>
  );
};
We are not done yet. We can improve our code further by moving the keyword and the search results to the machine as well.
First, we define a context for the state machine, with empty initial values. In state machine talk, the context is called extended state but we can think as a data store for the machine.
Then we listen to the SET_KEYWORD event on the initial state. When it occurs, we assign its data to our machine’s context. And on the SUCCESS event, we save the search results to the context.
import { createMachine, assign } from "xstate";

const searchFormMachine = createMachine(
  {
    id: "Search Form",
    initial: "initial",
    context: {
      keyword: "",
      results: [],
    },
    states: {
      initial: {
        on: {
          SEARCH: "loading",
          SET_KEYWORD: {
            actions: assign({
              keyword: (context, event) => event.keyword,
            }),
          },
        },
      },
      loading: {
        on: {
          SUCCESS: [
            {
              cond: "hasResults",
              target: "showResults",
              actions: assign({
                results: (context, event) => event.results,
              }),
            },
            {
              cond: "hasNoResults",
              target: "noResults",
              actions: assign({
                results: (context, event) => [],
              }),
            },
          ],
          ERROR: "failure",
        },
      },
      failure: {
        type: "final",
      },
      noResults: {
        type: "final",
      },
      showResults: {
        type: "final",
      },
    },
  },
  {
    guards: {
      hasResults: (context, event) => event.results.length > 0,
      hasNoResults: (context, event) => event.results.length === 0,
    },
  }
);
On the component, we may now remove the useState hooks for the keyword and the results and access the machine’s context using state.context. We were already sending the results as part of the SUCCESS event, so no changes are required there. On the input field’s onChange handler we can straight up call the send function and send the SET_KEYWORD event with the field value as data.
import { useMachine } from "@xstate/react";
import { searchFormMachine } from "./searchFormMachine.js";

const SearchForm = () => {
  const [state, send] = useMachine(searchFormMachine);

  const search = (event) => {
    event.preventDefault();

    send("SEARCH");

    fetchResults(state.context.keyword)
      .then((results) => {
        send({ type: "SUCCESS", data: results });
      })
      .catch((error) => send("ERROR"));
  };

  return (
    <div>
      <form onSubmit={search}>
        <input
          onChange={(event) =>
            send({ type: "SET_KEYWORD", data: event.target.value })
          }
        />
        <button type="submit" disabled={state.value === "loading"}>
          Search
        </button>
      </form>

      {state.value === "initial" && <p>Hi! Enter keyword please.</p>}
      {state.value === "loading" && <p>Searching...</p>}
      {state.value === "failure" && <p>Oh no!</p>}
      {state.value === "noResults" && <p>Sorry! No results.</p>}
      {state.value === "showResults" &&
        state.context.results.map((result) => <p>{result}</p>)}
    </div>
  );
};
Cool, now the component’s whole state is handled by XState. We have successfully moved the business logic out from the view layer handled by React. We could even move the fetching to be a part of the machine (maybe a reusable sub-machine?). Adding more features should now be pretty easy, too. If we needed to only allow sending the form, if the keyword were at least 3 characters long, we could add a guard for the transition from initial to loading. Or add a transition from initial to a new state readyForSubmitting, once the conditions are met, and only allow SEARCH event on the newly added state.
And by the way, our machine looks like this now:
The SET_KEYWORD event assigns the data but doesn’t trigger a transition while SUCCESS assigns and transitions at the same time.
ConclusionPermalink to Conclusion
State machines and statecharts are super effective tools when used correctly. I especially like the fact that when using them I’m forced to think about the behavior of the app and describe it before implementing it.
State machines add formalism and make code more robust by making sure there are no impossible states. They can separate business logic from the view layer and are a great way to make reusable logic. They are easy to represent visually, which can drastically help with communicating ideas, for example. State machines can replace other state management libraries, like Redux, or work alongside them.
On the other hand, state machines require you to think in a new mental model and can sometimes be a little overwhelming. A state machine with hundreds of lines of config code can seem like you are just moving your spaghetti from one plate to another. And you very well might be doing just that, but I still find organizing logic is much easier with state machines.
My recommendation: add state machines to your developer toolbox! Next time you are adding a third boolean flag to your component, think to yourself, “Could this be a state machine instead?”. I’ll promise, soon you’ll start to see state machines everywhere you look. You don’t need to use any library at all, you don’t even have to do a full-fledged FSM. Just replace multiple booleans with one state variable with multiple, predefined values and enjoy better quality code with fewer corner cases. If you decide to use a library, XState gets my vote.
Recommended readingPermalink to Recommended reading
- Wikipedia: Finite-state machine - In-depth article about FSMs and automata theory. A bit academic, but a good read nonetheless.
- statecharts.dev - A great little site about the world of statecharts.
- xstate.js.org - XState documentation.
- xstate-catalogue.com - A curated collection of high-quality XState state machines. A great resource for inspiration.
- Speed Tester (GitHub) - A simple game I made using XState and React. As seen on the TV game show Speden Spelit.